Keeping Account of Your Craft Business – Part 2

Finally, here is part 2 of the ‘Keeping Account of your Craft Business’ which is going to look at how to use a spreadsheet to record your transactions. If you haven’t read my previous post which introduces self-employment, and tax returns you can read it here.
One of the best things you can do – which will not only make things easier for you, but if you have an accountant, they will certainly appreciate your level of organisation – is to keep a good record of all the transactions relating to your business. By doing this, you can ensure that you submit your tax returns accurately, and therefore avoid having to pay out extra tax or fines in the future.
As I have mentioned in the previous post, you can keep your accounts in a number of ways from bespoke accounting software, to a lined notebook. A perfect middle ground for small handmade businesses and startups is to use a spreadsheet. You can acquire software for free or very cheaply, it is multifunctional, and formulas can do the adding up for you.
I was planning to create my own spreadsheet to help you get started, but I was happy to discover that this was not necessary. Xero, the cloud-based accounting software, already have a template on Google Sheets for this purpose. Therefore, I decided to have a mess around with the template, and explain in a little more detail how to use it.
Note: I have recently checked and it appears as though this template is no longer listed! I have a saved version, which you can visit here.
Firstly, get onto your browser and search for Google Sheets. It’s a free online-based piece of software, and your spreadsheets are saved onto the cloud space relating to your Google Account.
You will be greeted with something similar to this when going onto google sheets. Click on ‘Template Gallery’ below the search bar and to the right. All you need to do is browse through until you see the template ‘Financial Statements’ by Xero. You can see what it looks like on my recent templates.

Once you’re onto the template you will notice a few different tabs at the bottom. The first one you will be on gives you a brief description of how to use the spreadsheet. Have a quick read through, we will go into more depth on this post.
We are now going to look through each tab so you can understand the purpose of each.

This area is probably going to be where you spend a lot of your time. It is pretty straightforward to follow, and they have even included some example transactions. Just pop in the date, amount, description and classification of the transaction. If you receive money, it’s a positive number. Expenses are therefore represented by negative numbers. Always try to record transactions as accurately as possible, so at the year-end, you will still be able to remember what each expense was for.

The lock next to the tab name tells you that this sheet is not to be edited. This takes the data that you have recorded on the ‘Transactions’ tab and shows this in a more visually digestible format. Here you have a graph showing your income and expenses over time, a chart recording monthly sales and profits, more charts to show the least/most profitable months. You then have a graph to show a breakdown of the different types of expenses.
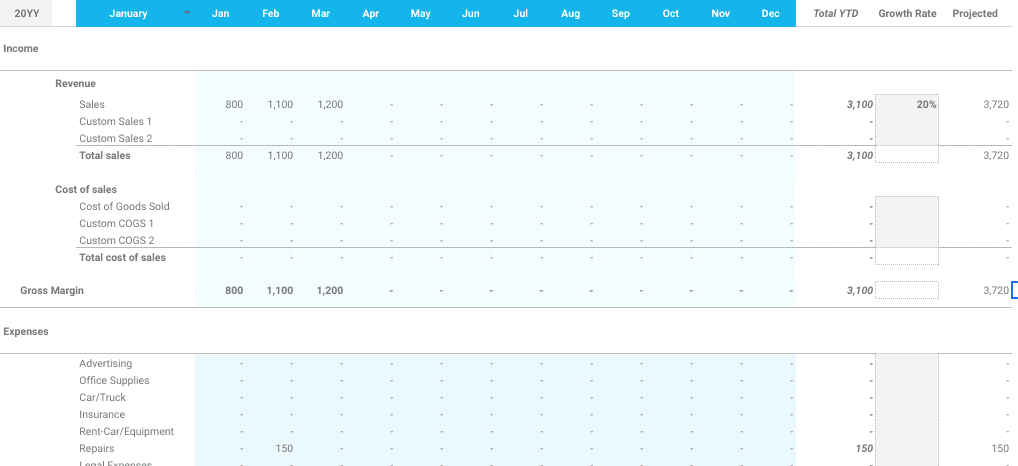
Similar to the dashboard, this sheet updates as you enter your transactions. You will see a monthly and year to date breakdown of your profit and loss statement. This goes into a lot more detail for each month compared with the dashboard and allows you to see how different sales and expense categories change over time.
The column titled ‘Growth Rate’ allows you to start making projections for next year. As an example, imagine you have started trading this year, and hope to increase your sales by around 20% next year by attending your local handmade fair and promoting your products further. You will pop in a 20% growth rate in sales, and maybe also increase certain expenses, such as for stock, advertising and hiring space at fairs. This will help you to create a budget for next year to help base your actual performance against.
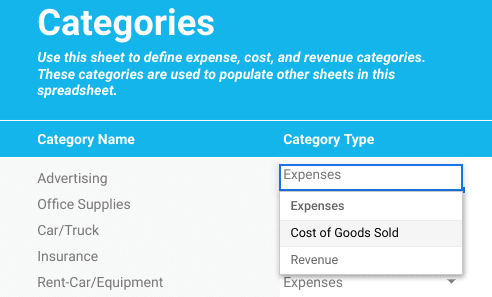
Here is where you can really personalise your financial records. The categories already here are generic ones that may or may not apply to your craft business. You can adjust these to be whatever you want them to be. Just check that you have the correct expense category selected. Sales categories are revenue, purchase of stock and materials are costs of goods sold. And other costs are expenses. As with the transactions tab, what you enter here will automatically update the other tabs.
The final tab. This one will need you to manually populate it with figures, so if you do not wish to do so, you do not have to. It may however help you split the business finances from your personal finances. Enter in the cash, stock, assets and invoices that are owed to you. Then, enter any debts, loans or balances you still owe to others. This will give you an overview of how much your business owns.
Now it is time to personalise your categories to suit your business. I removed ones that were not applicable to me and changed them to ones that were more suited. You may even adjust these further, depending on your individual needs. I have three sales categories – finished products, pattern sales and affiliate income. This allows me to break down sales figures from their source so I can see where my turnover is coming from.
Cost of goods sold is separated into ‘Yarn’, ‘Fabric’ and ‘Other’. These are costs directly relating to the items you have sold. So, in this case, the yarn that I use when I make coasters and dishcloths are a direct cost to make those items. You may not have direct costs for digital items but do check first. For example, if you create crafting videos, you may get a freelancer to create the written pattern or chart – this would be a direct cost. And just as with sales, you can break the cost of sales down. This can be a very useful figure. If you sell crochet blankets, for example, but your yarn costs are higher than your sales, you may want to look into your pricing. Also, check what yarn you have purchased but have not yet used – this will likely be used to make a product in the future.
Finally, you have your expenses. A lot of these are quite self-explanatory; Advertising for any ads you buy, website costs to run your website, gifts for any freebies you may give to customers (note: chat to a professional about these gifts, as not all of these will be allowable costs on your tax return) and also fees for listings on marketplaces such as Etsy.
There is also a work from home allowance category here. I imagine a lot of people will be running their small businesses from their homes, which will mean that you can claim an additional allowance for doing so. You can take utility bills and calculate a business proportion on them, but this can be quite confusing and will take a lot of time. Instead, HMRC allows the self-employed to claim simplified expenses that take the hard work out. The amount you claim is dependent on how many hours a month you spend working for your business at home, and this must be a minimum of 25 hours a month.
| Hours per month | Monthly Rate |
|---|---|
| 25 – 50 | £10 |
| 51 – 100 | £18 |
| Over 100 | £26 |
The rate is calculated on a month-by-month basis – so if you work 100 hours in one month, and 50 in another, you can claim £26 for the one month, and then £10 for the other.
You don’t really have to work much to claim this, either. Say you work 3-3.5 hours for 8 days during a month – around two days each week you will meet that 25 hour minimum for the month. That’s an extra £10 each month that will help reduce your tax liability at the year-end.

Make a start by entering some transactions. I’ve updated this section with a few transactions of my own to show how it all works. As you can see, our categories are all available here. Write in as much as you can in the description section as it will help you out a year down the line when you need to get the return done, and are trying to remember transactions from the previous April.
Congratulations! You have taken your first steps into bookkeeping.
Keep recording your transactions as you go along. How long and how often is dependent on the number of transactions you have. You may want to go through every week while it is still in your mind or may wait for your bank statement and run through all the transactions from there. This would also fit in if you receive sales through monthly payouts. By the end of the year, you will have a full breakdown of your expenses and income which is not only great for your tax return but also to really analyse how your business is performing.
If you would like to make a start with the template that I have adjusted, you can access it here.
Make sure that you are logged into your Gmail account in order to save a copy. Alternatively, you can download the document as an excel file.
And there it is! I’d recommend having a mess around with the template – maybe save a spare copy in case you accidentally change the formulas. Tailor your categories to your business, enter your transactions and see how that impacts your profit and loss. A future post will explain more about debits and credits, but for now you should at least be able to record your transactions throughout the year and make things easier for you when it comes to doing your self-assessment.
The other upside to using this Xero template is if your business begins to expand, you will be able to import your details onto a Xero subscription much easier!
Thank you for reading. Keep an eye out for Part 3 of this series, where we will look at some basic double-entry bookkeeping. If you missed part 1, you can read it here. Don’t worry, this will be nothing too tricky, but will help you understand what is happening when you are recording your transactions. Don’t forget to subscribe/like/follow to keep up to date with the latest posts.
In case anyone from the Xero team comes across this post, I’d like to say a big thank you to them for providing this template for people to use. I think it is a simple, yet effective way to record purchases and sales, especially for those running a business in their free time, which a lot of crafters do.
I would also recommend to crafters and small business owners to subscribe to the Xero package when they feel as though they have outgrown this simple spreadsheet. I use Xero a lot on my main job and find it really easy to use and it helps record all the necessary info that I would need to prepare year end accounts and tax returns. This is not an affiliate or sponsored post, as I do not have an agreement with Xero – this is just me speaking from personal experience!
If you have any questions in the meantime, feel free to contact the blog (link to the contact form on the top menu) or drop a comment here.